|
 |
UV mapping
of only Wings 3D
It is efficient when UV mapping and control of a polygon can be done
with the same tool. I couldn't do UV mapping with Wings 3D well till
now. But, it was discovered when that was possible when the "Snap
Image Mode" was used.
*Used version 0.98.17g
Non Photo Realistic Texture
I make texture by vector drawing tool. It can cope with a non-continuous
UV. When it is this condition, an advanced function is unnecessary
at editing UV coordinates. And a low data rate as to the high resolution.
(Reducing file size is easy)
Low-polygon model
It is the factor which makes work concise that the number of polygons
is low, too. But, it thinks that this method is convenient even for
the high resolution polygon model. (Probably)
Result
sample |
Details
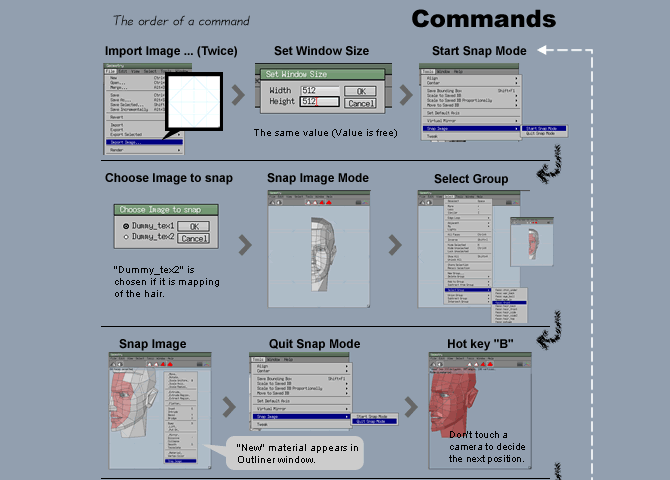
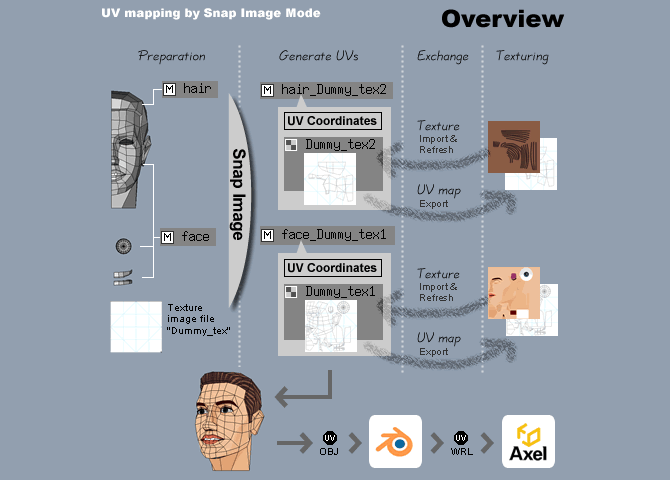
Preparatin
First, you should plan a texture apply faces. Then, one dummy texture
file is imported twice. Two kinds of texture are being used for the
head in the upper figure.
Generate UVs
"Snap Image" is chosen in Snap Image Mode. The "New"
material which has a UV coordinates is made. And, that has texture,
too. "New" material manages texture and faces and UVs.
*It gets confused when a snap does a face (another material) except
for the plan. Apply material carefully at a stage of preparation.
*As for the face of the material which doesn't have UV, it can't be
applied to the "New" material. Wings 3D crashes with AutoUV.
(I experience it with ver0.98.17g)
Exchange
Choose UVmap image in the outliner window, and export it. Made texture
is imported and drag and drop to material in the outliner window.
(Texture type is Diffuse) |
 |
Limitation
UV mapping to the symmetrical object is presumed. When it isn't symmetrical,
it thinks that the control of the distance and the angle is difficult.
In that case, fix a camera, and turn an object. (Not test)
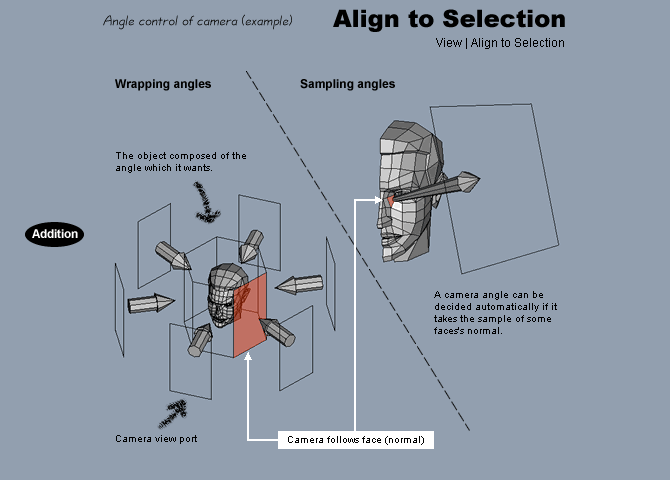
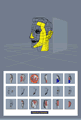
Camera angle which I chose
See an upper figure. An angle "B" is important. This may
be the front in usual. This is the best angle in the range that I
tried. This was chosen because there was the least distortion to draw
a curve. Furthermore, it was necessary that a curve could be drawn
continuously, too. Try to look for the angle which is the most suitable
for the purpose. |
The model
of the head
This example is the same as the model of "Low-Poly
Modeling Tutorial". The angle and faces which is different
when other models are used is necessary.
Details of angle and faces
 |
An interactive viewer (160KB)
*Requirement : AXEL & FLASH Player
*Not test MacOS |
|
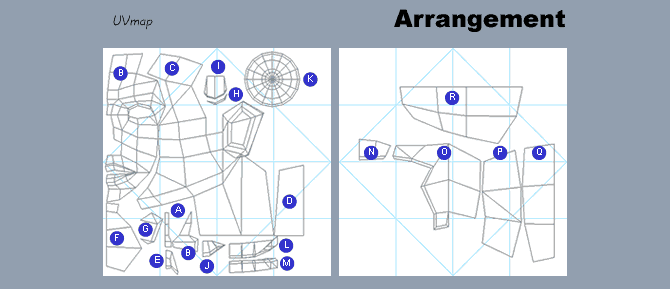 |
UVmap
Refer to this position when you do a snap image with a Snap Image
Mode. Be careful with the control of the camera. I'm using "Mirai"
in the camera mode.
*Use orthogonal view
AutoUV
A UVmap (Edge line image) is made by AutoUV. Move to the AutoUV mode
every time you quit the Snap Image Mode. at concrete process is explained
in the next chapter.
|
Camera
control (UV mapping theory)
UVmap "face"
High details texture area (gradation) is expanded. Low details texture
area (single color) is small. Same detailes texture area takes the
same size. (If possible)
UVmap "hair"
A zoom is fixed. A hot key Z, Shift+Z, X and Y are used. Track with
arrow key. Object rotated at "R". It is arranged in accordance
with other size at "P". |
 |
Combination
UVmap can't be made only by the Snap Image Mode.
It is surely used with AutoUV. UV coordinates information is made
an image (UVmap) by the operation of AutoUV. In other words, it is
when "Save UV Coordinates and Texture" is chosen at the
time of the quit of AutoUV. Then, that can be seen when the next Snap
Image Mode is used.
|
Editing
UVmap
For example a position on the face of the nose is edited with AutoUV
as the upper figure. Refresh texture if an image becomes dirty with
the change of the arrangement. Then, make UVmap by the latest UV coordinates. |
How do
you like it?
It isn't difficult if it tries several times. Enjoy it! :)
|
Some
news
Saved Views (ver0.98.22) g r e a t ! :)
Snap Image workflow improved (ver0.98.21)
AutoUV restored the Scale command. (ver0.98.20a)
* Use "Create Texture" for saving UV map.
Added new command to Snap Image Mode. (ver0.98.19c)
-Scale Snap Image, Move Snap Image
*With TAB Key |
Wrapping
angles
Though it isn't actually trying, the control of the camera will be
easy. But, the choice of the face may be difficult. Do you try?
|
Sampling
angles
The average angle of some faces's normal can be extracted. (Probably
) Try some times, and grasp a point. |
|